This is the Documentation for the Dynamic Content Gallery plugin for WordPress. Links to other resources for this plugin can be found in the menu in the sidebar.
Current version of the plugin is: 3.3.6
This Documentation page describes installation of the plugin and details of each option provided in the plugin’s Settings Page. Rather more user-friendly setup instructions can be found in the Configuration Guide.
-
Rating: +0


Docs - Information and Resources
This documentation is for version 3 of the Dynamic Content Gallery plugin.
Information on Installation, together with the official documentation for the plugin, can be found here.
New users of the plugin may find the wealth of information contained in the plugin's Settings page a little daunting. Don't panic! Check out the Quick Start Guide for an introduction to getting the plugin up and running.
Further resources
Dynamic Content Gallery home page - the plugin's homepage.
Quick Start Guide - a guide for new users.
Configuration Guide - more detailed instructions for setting up the plugin, and explanation of key plugin Settings.
Error Messages - a guide to the HTML Source Code error messages.
FAQ - troubleshooting tricks and tips.
Support Forum - for posting support questions (please read the FAQ first!).Note for WordPress Multisite users
Some features, namely the choice of Full or Partial URL for images, and the use of default images, are not available when the plugin is installed on Network-enabled WordPress (Multisite).
Unless stated otherwise, features apply to both WordPress and WordPress Multisite installations. Multisite-only instructions are provided in the relevant sections of this documentation. -
Rating: -1
Docs - Installation - First time install
Warning: Dynamic Content Gallery versions 3.3 and higher require WordPress 3.0+. Do not install it on a lower version of WordPress - it won't work. Please upgrade to the latest version of WordPress.- Download the latest version of the plugin to your computer.
- Extract and upload the folder dynamic-content-gallery-plugin to your /wp-content/plugins/ directory. Please ensure that you do not rename any folder or filenames in the process.
- Activate the plugin in your Dashboard via the “Plugins” menu item.
- Go to the plugin's Settings page, and configure your settings.
Note for WordPress Multisite users
- Install the plugin in your /plugins/ directory (do not install in the /mu-plugins/ directory).
- In order for this plugin to be visible to blog owners, the plugin has to be activated for each blog by the Network Administrator. Each blog owner can then configure the plugin's Settings page in their Admin Settings.
-
Rating: +0
Docs - Installation - Upgrading from an earlier version
Warning: Dynamic Content Gallery versions 3.0+ require WordPress 2.8+. Do not install it on a lower version of WordPress - it won't work. Please upgrade to the latest version of WordPress before upgrading the plugin.These instructions are for upgrading your existing version to the latest version 3.2.1
Upgrading from version 3.2
Either use the AUTOMATIC upgrade option from within the WordPress Dashboard>Plugins screen, or upgrade MANUALLY following these instructions:
- Deactivate the existing Dynamic Content Gallery in Dashboard > Plugins > Installed. Do not delete the plugin via the Dashboard > Plugins menu. If you do, you will lose your existing plugin Settings.
- Using your FTP client software, delete the existing dynamic-content-gallery-plugin folder from your /wp-content/plugins/ folder.
- Download the latest version of the plugin to your computer.
- Extract and upload the folder dynamic-content-gallery-plugin to your /wp-content/plugins/ directory. Please ensure that you do not rename any folder or filenames in the process.
- Activate the plugin in your Dashboard via the “Plugins” menu item. This will upgrade your plugin and preserve your existing Settings.
- Browse to the page where your gallery is located and check that it is working properly. It should look and work exactly as it did before the upgrade.
Upgrading from version 3.0 or 3.1
Either use the AUTOMATIC upgrade option from within the WordPress Dashboard>Plugins screen, or upgrade MANUALLY following these instructions:
- Deactivate the existing Dynamic Content Gallery in Dashboard > Plugins > Installed. Do not delete the plugin via the Dashboard > Plugins menu. If you do, you will lose your existing plugin Settings.
- Using your FTP client software, delete the existing dynamic-content-gallery-plugin folder from your /wp-content/plugins/ folder.
- Download the latest version of the plugin to your computer.
- Extract and upload the folder dynamic-content-gallery-plugin to your /wp-content/plugins/ directory. Please ensure that you do not rename any folder or filenames in the process.
- Activate the plugin in your Dashboard via the “Plugins” menu item. This will upgrade your plugin and preserve your existing Settings.
- Browse to the page where your gallery is located and check that it is working properly. It should look and work exactly as it did before the upgrade.
- The first time you visit the plugin's Settings page after installing 3.2, you will be prompted to perform a Custom Field upgrade. Follow the on-screen instructions to perform this upgrade. Further information regarding this Custom Field upgrade can be found here.
Upgrading from version 2.2
Either use the AUTOMATIC upgrade option from within the WordPress Dashboard>Plugins screen, or upgrade MANUALLY following these instructions:
- Deactivate the existing Dynamic Content Gallery in Dashboard > Plugins > Installed. Do not delete the plugin via the Dashboard > Plugins menu. If you do, you will lose your existing plugin Settings.
- Using your FTP client software, delete the existing dynamic-content-gallery-plugin folder from your /wp-content/plugins/ folder. Make a note of any manual changes you may have made to the jd.gallery.css and jd.gallery.js files before you do this, so that you can configure the new version 3 options in the Settings page.
- Download the latest version of the plugin to your computer.
- Extract and upload the folder dynamic-content-gallery-plugin to your /wp-content/plugins/ directory. Please ensure that you do not rename any folder or filenames in the process.
- Activate the plugin in your Dashboard via the “Plugins” menu item. This will upgrade your plugin and preserve your existing Settings.
- Browse to the page where your gallery is located and check that it is working properly. It should look and work exactly as it did before the upgrade. Note:If you see the gallery is broken and all the images appear in one long column down the page, this is because the newly upgraded plugin Settings are set to load the gallery scripts on the home page only - and your gallery isn't located on your home page. Therefore, go to the plugin's Settings page and configure the Restrict Scripts option.
- The first time you visit the plugin's Settings page after installing 3.2, you will be prompted to perform a Custom Field upgrade. Follow the on-screen instructions to perform this upgrade. Further information regarding this Custom Field upgrade can be found here.
Upgrading from a v3 RC release or 2.3*
- Deactivate the existing Dynamic Content Gallery in Dashboard > Plugins > Installed. Do not delete the plugin via the Dashboard > Plugins menu. If you do, you will lose your existing plugin Settings.
- Using your FTP client, delete the existing dynamic-content-gallery-plugin folder from your /wp-content/plugins/ folder.
- Download the latest version of the plugin to your computer.
- Extract and upload the folder dynamic-content-gallery-plugin to your /wp-content/plugins/ directory. Please ensure that you do not rename any folder or filenames in the process.
- Activate the plugin in your Dashboard via the “Plugins” menu item.
- The first time you visit the plugin's Settings page after installing 3.2, you will be prompted to perform a Custom Field upgrade. Follow the on-screen instructions to perform this upgrade. Further information regarding this Custom Field upgrade can be found here.
- Once the Custom Field upgrade has been performed, you will be able to access the plugin's usual Settings page. Check that your existing plugin settings have been preserved. Configure any new Settings which may not have existed in the v3 RC releases.
* Note that "2.3" was an early beta version of what is now version 3.0, and was never an official release.
Note for WordPress Mu users
- Follow the above instructions relevant to the version you are upgrading from. Note: WPMU version 2.8+ is required.
- Install the plugin in your /plugins/ directory (do not install in the /mu-plugins/ directory).
- In order for this plugin to be visible to blog owners, the plugin has to be activated for each blog by the Site Administrator. Each blog owner can then configure the plugin's Settings page in their Admin Settings.
- In order to complete the installation process it is necessary to run a Site Admin Upgrade in order to upgrade the Custom Field data relelvant to the Dynamic Content Gallery. Blog Owners will be unable to administer the plugin's Settings until the Site Admin Upgrade is performed. Further information regarding this Custom Field upgrade can be found here.
-
Rating: +0
Docs - How to add the Dynamic Content Gallery to your Theme
Warning: Regardless of which template file you place it in, the DCG code must NOT be used within the Loop or within a loop generated by a WP_Query custom query.New installation
Add this code to the relevant theme template file depending on where you want to display the Dynamic Content Gallery:
<?php dynamic_content_gallery(); ?>Upgrading from version 2.2 or earlier
To ensure compatibility with future versions of the plugin, it is recommended that you replace the existing code:
<?php include (ABSPATH . '/wp-content/plugins/dynamic-content-gallery-plugin/dynamic-gallery.php'); ?>with the new plugin function, ie this:
<?php dynamic_content_gallery(); ?>Notes for WordPress Mu users
To avoid problems with fatal errors in cases where blog owners do not have the plugin activated for their site, add the template code like this:
<?php

if( function_exists( 'dynamic_content_gallery' ) ) :

dynamic_content_gallery();

endif;

?>
Unsure about which template file should contain this code? Read the How to choose the correct theme template when adding the plugin code section of the Configuration Guide. -
Rating: +2
Docs - How to assign an image and description to each Post/Page
Since version 3.2, images and slide pane descriptions are handled via the Dynamic Content Gallery metabox, which you should see in the Write Post/Page screen.
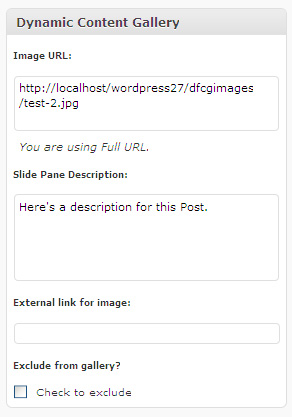
Image URL:
Enter the URL to your image in this field. In this example, FULL URL option has been set in the Image file management settings.
Slide Pane Description
If you have selected the Manual option in the Slide Pane Description settings, you may type your description into this box.
-
Rating: +0
Docs - How to assign an external link to a gallery image
By default, clicking on an image in the gallery takes the user to the image's Post or Page. If you wish to link a gallery image to a different resource, eg another page on your site or an external site, create the following custom field for the relevant Post/Page:
- Custom field dfcg-link with the full URL for the link. For example: http://www.anothersite.com
This is optional and you only need this custom field if you require images to link somewhere other than the image's Post/Page.
-
Rating: +0
Docs - Uploading your images
Use the Media Uploader in Write Posts / Write Pages to upload your gallery images. With the Media Uploader pop-up open, select "Choose Files to Upload" and browse to your chosen image. Once the Media Uploader screen has uploaded your file and finished "crunching", copy the URL shown in the "File URL" box and paste it in to the dfcg-image custom field in the Write Post screen.
Although this section was originally written for WPMU users, it is just as applicable to WordPress users, especially if you have selected the Full URL option in the Image file management settings. -
Rating: +0
Docs - How to name and organise your default images
A key feature of this plugin is its automatic use of default images in the event a Custom Field dfcg-image has not been created for a Post/Page. This is a useful fallback because missing images can prevent the gallery from loading properly. Therefore, it is recommended, though not compulsory, that you set up default images as described below.
Gallery Method: Multi Option and One Category
These methods use Posts and Categories to populate the gallery. In the event that a Custom Field is missing from a Post, the plugin will display a default image determined by the Category ID for that Post. Create a default image for each of the Categories specified in the Multi Option Settings, or the Category specified in the One Category Settings, depending on which Gallery Method you have selected.
In either case, default images must be named as follows: XX.jpg, where XX is the Category ID. For example, the default image that will be displayed for a Post in Category ID=8 must be named 8.jpg. Once you have created your default images, and named them as per these instructions, upload them to the folder specified in the Multi Option or One Category Settings as appropriate.
Gallery Method: Pages
In this case, only one default image is required, and you have complete freedom to name the image as you wish (any valid image extension is permitted). Upload the image to somewhere on your site and enter the full URL to the image in the Pages Settings.
Note for WordPress Mu users
The default images feature is not available for WPMU.
-
Rating: +0
Settings: Image Management
Complete the following settings to set up your gallery image file management preferences. Your selection determines the form of the image URL which is entered in the dfcg-image Custom Field added to the Posts or Pages featured in the gallery.
Need more help with understanding this Setting? Further information can be found in the Configuration Guide.Full URL (Default)
Enter Custom Field dfcg-image in this format: http://www.yourdomain.com/folder/anotherfolder/myimage.jpg
Select this option if you want complete freedom to reference images anywhere in your site and in multiple locations.Tip: This is a good option if you keep images in many different directories both inside and outside of the /wp-content/uploads folder, as it allows maximum flexibility for where you store your images. Also, select this option if your images are stored off-site eg Flickr, Picasa etc. This is also a recommended option if you use the Media Uploader for uploading images to your site - just copy the File URL from the Uploader screen and paste it into the custom field.Partial URL
Enter Custom Field dfcg-image in this format: subfoldername/myimage.jpg
Select this option if your images are organised into many sub-folders within one main folder. The URL to the main folder is entered in the field below.Tip: This is the "default" option if you have upgraded from an earlier version of the Dynamic Content Gallery.URL to Custom Field images folder:
If you selected Partial URL you must also specify the URL to the top-level folder which contains the relevant sub-folders and images. Include http://www.yourdomain.com/ in this URL, for example: http://www.yourdomain.com/myspecial_image_folder/
Note for WordPress Mu users
Image File Management is disabled for WPMU. The Custom field dfcg-image must always use the Full URL to the image, eg http://www.yourdomain.com/folder/anotherfolder/myimage.jpg. See Uploading your images for how to upload images to your blog.
-
Rating: +0
Docs - 2. Gallery Method (REQUIRED)
The Dynamic Content Gallery offers three different methods for populating the gallery with images. Select the option most appropriate for your needs.
Multi Option
Complete freedom to select up to 9 images from a mix of categories. Set up the relevant options in 2.1 MULTI OPTION Settings
Tip: This is a the original method used in previous versions of the plugin, and the option to choose if you want to mix posts from different categories.One Category
Images are pulled from a user-definable number of Posts from one selected Category. Set up the relevant options in 2.2 ONE CATEGORY Settings
Tip: This is the best option if you use a Featured or News category for highlighting certain posts. You can also use this option to display the latest Posts from all categories.Pages
Images are pulled from Pages, rather than Posts. Set up the relevant options in 2.3 PAGES
Tip: This could be a good option if your site is more CMS than Blog. -
Rating: +0
Docs - 2.1 MULTI OPTION Settings (Required if you selected Multi Option in Gallery Method)
Configure this section if you chose Multi Option in the Gallery Method Settings. The Multi Option method of populating the gallery provides up to 9 image "slots", each of which can be configured with its own Category and "Post Select". For the Post Select: enter 1 for the latest post, 2 for the last-but-one post, 3 for the post before that, and so on.
Need more help understanding this Setting? Further information on the possible Post Select/Category schemes can be found in the Configuration Guide.Tip: If you want to pull in the latest posts from one category, don't use Multi Option, use the One Category Gallery Method instead. It's much more efficient in terms of database queries.Tip: Want to show less than 9 images? Delete the contents of the Post Select fields for image slots you don't need.URL to default "Category" images folder:
Enter the URL to the folder which contains the default images. The default images will be pulled into the gallery in the event that Posts do not have an image specified in the Custom Field dfcg-image. This must be an absolute URL. For example, if your default images are stored in a folder named "default" in your http://www.yourdomain.com/wp-content/uploads folder, the URL entered here will be: http://www.yourdomain.com/wp-content/uploads/default/
Note for WordPress Mu users
The default images feature is disabled for WPMU.
-
Rating: +1
Docs - 2.2 ONE CATEGORY Settings (Required if you selected One Category in Gallery Method)
Configure this section if you chose One Category in the Gallery Method Settings.
Select the Category:
Select the category from the dropdown list. Only categories that have posts are listed in the dropdown.
Number of Posts to display:
Select the number of Posts to display in the gallery from the dropdown list. The minimum number of Posts is 2, the maximum is 15 (for performance reasons).
URL to default "Category" images folder:
Enter the URL to the folder which contains the default images. The default images will be pulled into the gallery in the event that Posts do not have an image specified in the Custom Field dfcg-image. This must be an absolute URL. For example, if your default images are stored in a folder named "default" in your http://www.yourdomain.com/wp-content/uploads folder, the URL entered here will be: http://www.yourdomain.com/wp-content/uploads/default/
Note for WordPress Mu users
The default images feature is disabled for WPMU.
-
Rating: +0
Docs - 2.3 PAGES Settings (Required if you selected Pages in Gallery Method)
Configure this section if you chose Pages in the Gallery Method Settings.
Page ID numbers:
Enter ID's in a comma separated list with no spaces, eg: 2,7,8,19,21
Specify a default image:
This image will be displayed in the event you haven't assigned a Custom Field dfcg-image to one of your selected Pages.
Upload a suitable image to your server and enter the absolute URL to the default image.
For example: http://www.yourdomain.com/somefolder/anotherfolder/mydefaultimage.jpgNote for WordPress Mu users
The default images feature is disabled for WPMU.
-
Rating: +0
Docs - 3. Slide Pane Descriptions (OPTIONAL)
This option is applicable to all Gallery Method Settings.
The Dynamic Content Gallery displays a description for each image in the gallery Slide Pane. Choose between Manual or Auto Description methods for displaying a description for each image in the gallery Slide Pane. The Slide Pane has relatively little space in which to display this text, and therefore it is recommended to keep the description short, probably less than 25 words.
Manual
Create your own Slide Pane description using a Custom field dfcg-desc. Enter your text in this Custom field, for example: Here's our latest news!
When configured for Manual descriptions, the plugin looks for the image description in this sequence: (1) a custom field dfcg-desc, (2) a Category Description if that exists (not applicable to the Pages Gallery Method), or finally (3) the default description created here.
Tip: Manual Default Description: Allowed XHTML tags are: <a href=" " title=" ">, <strong>, <em>, <br />Tip: Create the Category Descriptions in Dashboard>Posts>Categories.Auto
With this option, Slide Pane Descriptions are created automatically from your Post/Page content. You may specify the number of characters to be displayed, and the text for the "More" link displayed at the end of the Auto description.
-
Rating: +0
Docs - 4. Gallery size and CSS options (REQUIRED)
Note: The CSS options displayed on the Settings page vary slightly depending on whether you are using the mootools or jQuery Javascript Framework for generating the gallery. Options marked (*) are only available when the jQuery Javascript Framework is being used. In either case, Options marked (**) are only applicable if Auto Slide Pane Descriptions have been selected.Configure various layout and CSS options for your gallery including the size of the gallery, the height of the Slide Pane, gallery border, and the font sizes, colours and margins for the text displayed in the Slide Pane.
Gallery Width:
This is the overall width of the gallery in pixels. Default is 460px.
Tip: Set the gallery width and height the same as your image sizes.Gallery Height:
This is the overall width of the gallery in pixels. Default is 250px.
Gallery border width:
This sets the width of the border around the gallery. If you don't want a border enter 0 in this box. Default is 1px.
Tip: The overall dimensions of the DIV that contains the gallery is the gallery width/height plus the border width set here.Gallery border colour:
This sets the colour of the gallery border. Enter color hex code like this #000000. Default is #000000.
Gallery Background*:
This sets the colour of the gallery background (jQuery only). Enter color hex code like this #000000. Default is #000000.
Slide Pane Height:
This sets the height of the Slide Pane. Default is 50px.
Slide Pane Background*:
This sets the Slide Pane background colour (jQuery only). Enter color hex code like this #000000. Default is #000000.
Slide Pane Position*:
This sets the position of the Slide Pane relative to the gallery (jQuery only). Options are "top" and "bottom". Default is bottom.
Heading font size:
This sets the size of the Post/Page title which is displayed in the Slide Pane, in pixels. Default is 12px.
Heading font weight*:
This sets the font-weight of the Post/Page title which is displayed in the Slide Pane (jQuery only). Options are "bold" and "normal". Default is bold.
Heading font colour:
This sets the colour of the Post/Page title displayed in the Slide Pane. Enter color hex code like this #FFFFFF. Default is #FFFFFF.
Heading Padding top and bottom:
This sets the top and bottom padding of the Post/Page title displayed in the Slide pane, in pixels. Default is 0px.
Heading Padding left and right:
This sets the left and right padding of the Post/Page title displayed in the Slide pane, in pixels. Default is 0px.
Heading Margin top and bottom:
This sets the top and bottom margin of the Post/Page title displayed in the Slide pane, in pixels. Default is 2px.
Heading Margin left and right:
This sets the top and bottom margin of the Post/Page title displayed in the Slide pane, in pixels. Default is 5px.
Description font size:
This sets the size of the Description text which is displayed below the Post/Page title in the Slide Pane, in pixels. Default is 11px.
Description font colour:
This sets the colour of the Description text in the Slide Pane. Enter color hex code like this #FFFFFF. Default is #FFFFFF.
Description line height*:
This sets the line-height of the Description text in the Slide Pane, in pixels (jQuery only). Default is 14px.
Description Padding top and bottom:
This sets the top and bottom padding of the Description displayed in the Slide pane, in pixels. Default is 0px.
Description Padding left and right:
This sets the left and right padding of the Description displayed in the Slide pane, in pixels. Default is 0px.
Description Margin top and bottom:
This sets the top and bottom margin of the Description displayed in the Slide pane, in pixels. Default is 2px.
Description Margin left and right:
This sets the left and right margin of the Description displayed in the Slide pane, in pixels. Default is 5px.
Description More link colour**:
This sets the colour of the "More" link text. Default is #FFFFFF.
Description More link font weight**:
Choose between Bold or Normal. Default is Normal.
Description More link hover colour**:
This sets the colour of the "More" link text on hover. Default is #FFFFFF.
Description More link hover font weight**:
Choose between Bold or Normal. Default is Bold.
-
Rating: +0
Docs - 5. Select Javascript Framework (REQUIRED)
Note: New in version 3.0 is the ability to switch between the original mootools-driven script and a jquery-driven script for displaying the gallery. This should assist those who find that mootools conflicts with other plugins.Select the javascript framework to be used to display the gallery.
Mootools (Default)
Use SmoothGallery Mootools script. This is the default setting.
jQuery
Use alternative jQuery script. Select this option in case of javascript conflicts with other plugins.
Warning: The jQuery script does not have all of the display features of the mootools version (no carousel). It is intended that in future versions the jQuery script will produce an identical gallery to that produced by mootools. In the meantime, try them both out and see which you prefer! -
Rating: +0
Docs - 6. Javascript configuration options (OPTIONAL)
Note: The Javascript options displayed on the Settings page vary slightly depending on whether you are using the mootools or jQuery Javascript Framework for generating the gallery. Options marked (j) are only available when the jQuery Javascript Framework is being used, those marked (m) are only available when the mootools Javascript Framework is being used.Configure various default javascript settings for your gallery. The addition of these options in this Settings page saves you having to customise the plugin's javascript files.
Show Carousel (m):
Check the box to display thumbnail Carousel. Default is CHECKED.
Carousel label (m):
Label for Carousel tab. Only visible if "Show Carousel" is checked. Default is Featured Articles.
Show Slide Pane (m):
Check the box to display Slide Pane. Default is CHECKED.
Animate Slide Pane (m):
Check the box to have Slide Pane slide into view. Default is CHECKED.
Slide Pane Opacity (m)(j):
Opacity of Slide Pane. 1.0 is fully opaque, 0.0 is fully transparent. Default is 0.7.
Timed transitions (m):
Check the box to have timed image transitions. Default is CHECKED. Tip: If you uncheck this setting, users must click the left and right gallery arrows to scroll through the images in the gallery.
Transitions delay (m)(j):
Enter the delay time (in milliseconds, minimum 1000) between image transitions. Default is 9000. Tip: This setting is only relevant if you CHECKED the Timed Transitions setting.
Transitions speed (j):
Enter the speed of image transitions (in milliseconds, minimum 1000). This sets the duration of the transition from one image to the next. Default is 1500.
Transition type (m):
Select the type of image transition from "fade", "fadeslideleft", "continuoushorizontal" or "continuousvertical". Default is "fade".
Navigation theme (j):
Choose style of next/prev arrows: light or dark. Default is light.
Pause on hover (j):
Check the box to pause the slideshow on mouseover. Default is CHECKED.
Fade panels (j):
Check the box to use fade transitions between images. Default is CHECKED.
Disable Mootools (m)
Check the box ONLY in the event that another plugin is already loading the Mootools Javascript library files in your site. Default is UNCHECKED.
Tip: This is an advanced setting and you should only check this box if you are using another plugin or script that uses Mootools v1.11. Note that unchecking this setting will NOT prevent javascript conflicts with other libraries such as jQuery, Prototype etc. Note: The current version of the Smoothgallery script is not compatible with Mootools v1.2+. -
Rating: +0
Docs - Load Scripts options
This option lets you restrict the loading of the plugin's javascript to the page that will actually display the gallery. This prevents the scripts being loaded on all pages unnecessarily, which will help to minimise the impact of the plugin on page loading times. This option applies to both mootools and jquery Javascript options.
Need more help with understanding this Setting? Further information can be found in the Configuration Guide.Home page only
Select this option to load the plugin's scripts ONLY on the homepage.
Tip: Best option if the gallery will only be used on the home page of your site. This is the default.
Tip: Select this option if you use a Static Front Page defined in Dashboard > Settings > Reading and the gallery will only be shown on the home page.Specific Page Template
Select this option to load the plugin's scripts ONLY when a specific Page Template is being used to display the gallery.
Tip: Best option if the gallery is displayed using a Page Template. Enter the Page Template filename below.Page Template filename:
If you selected the Specific Page Template option above, enter the filename of the Page Template here, eg mypagetemplate.php.
Tip: It is possible to specify more than one Page Template. Enter the filenames of your Page Templates separated by a comma, eg mytemplate1.php,mytemplate2.php.Other
Check this option if none of the above apply to your setup.
Warning: The plugin's scripts will be loaded in every page. Not recommended. But not the end of the world either - this is exactly how the previous version of the plugin loaded its scripts. -
Rating: +0
Docs - 8. Error message options (OPTIONAL)
The plugin produces informative error messages in the event that Posts, Pages, images and descriptions have not been configured properly, which will assist with troubleshooting. These error messages, if activated, are output to the Page Source of the gallery as HTML comments. Error message explanations can be found in the Error Messages guide.
Check box to show Page Source error messages, uncheck the box to hide them. Default is UNCHECKED.
Tip: When troubleshooting problems with the gallery, turn on error messages and refer to the Error Messages guide for explanations and suggested fixes. -
Rating: +0
Docs - 9. Add Custom Field columns to Posts and Pages Edit screen (OPTIONAL)
These settings let you display a column in the Edit Posts and Edit Pages screens to show the value of the dfcg-image and dfcg-desc Custom Fields. This can be useful to help keep track of the contents of the dfcg-image and dfcg-desc Custom Fields without having to open each individual Post or Page.
Show columns in Edit Posts:
Check the boxes to add columns to the Edit Posts screen. Default is CHECKED.
Show columns in Edit Pages:
Check the boxes to add columns to the Edit Posts screen. Default is CHECKED.
-
Rating: +1
Docs - Reset all options to the default settings
Check the box, then click the "Save Changes" button.
