
Recently, I have been spending a lot of time developing some new automation functionality for my Dynamic Content Gallery plugin, working out how best to get the plugin to use WordPress’ Featured Image functionality and to automatically create the correct additional image sizes when adding and uploading images via the WP Admin UI.
During this work I discovered, perhaps to my shame, that I didn’t know quite as much about Media handling in WordPress as I thought I did. I also found out that, sometimes, WordPress does not behave as intuitively as one might expect or, to be more precise, certain behaviours are not so obvious as one might think – such as how best to use the WordPress add_image_size() function to create additional image sizes.
The purpose of this article is to give detailed information on how to use Featured Images and the add_image_size() function and, with examples, demonstrate the consequences of using the various cropping and resizing options available in this function. At the same time, I thought it would be useful to take another look at how WordPress handles uploaded images and its default image sizes.
Article contents
There’s a lot of information in this long, long article, so here are some links to help you navigate around it!
- WordPress Media basics – image handling
- Featured Image basics
- Using add_image_size() to customise the Featured Image
- Examples using add_image_size()
WordPress Media basics – image handling
It’s essential to understand the main aspects of the way WordPress handles media images before we look at the Featured Image functionality and the use of additional image sizes added via the add_image_size() function…
Default image sizes
Whether you upload an image via the Media Uploader (Add Media button) in the Post Editor, or directly into the Media Library via the Dashboard > Media > Add New panel, WordPress automatically creates several versions of the image during the “crunching…” phase of the upload process, and places these versions on your server:
- Thumbnail size
- Medium size
- Large size
- plus the Original image, if larger than the Large Size dimensions
The dimensions of these default image sizes are set in the Dashboard > Settings > Media options (see screenshot) and, by default, are set as follows:

- The default Thumbnail Size is 150px x 150px (with a cropping option, which we will discuss later on)
- The default Medium Size is max width 300px, max height 300px
- The default Large Size is max width 1024px, max height 1024px
Understanding the Media Settings size options
WordPress uses two methods to resize images – a “hard crop” method, and a “soft crop” (or “box resize“) method. The Medium and Large Sizes use the “box resize” method, which means that the image size is reduced until the largest dimension (horizontal or vertical) fits inside the “box” determined by the “Max Width” and “Max Height” settings. Let’s look at some examples…
Let’s say we upload an image which is 600px wide by 600px high, the created Medium Size image will be 300px by 300px. This makes sense, given the aspect ratio of 1:1. (See fig 1 below)

Fig. 1 Original image of 600px x 600px results in Medium Size image of 300px x 300px
However, if the Original image is 300px wide by 600px high, as the largest dimension in this case is the height, the image is reduced so that the height fits within the Max Height setting of 300px (in a default setup). The original aspect ratio is preserved, therefore the resulting Medium Size image will be 150px wide by 300px high. (See fig 2 below)

Fig. 2 Original image 300px x 600px results in Medium Size image of 150px x 300px
Similarly, if we assume that the Original image is 300px high by 600px wide, the Max Width setting sets the maximum dimension and therefore the resulting Medium Size image will by 150px high by 300px wide. (See fig. 3 below)

Fig. 3 Original image 600px x 300px results in Medium Size image of 300px x 150px
In other words, the original image is reduced until it fits inside the 300px by 300px “box” – hence the term “box resize”.
Significantly, the Thumbnail setting can either use the “box resize” method or, if the “Crop” box is checked, the “hard cropping” method, meaning that the resulting Thumbnail Size image will always be sized as per the specifed Width and Height settings. This means cropping will occur if the original image size has a different aspect ratio to that implied by the Thumbnail Width and Height settings. To use the “box resize” method, uncheck the Thumbnail “Crop” box.
What images does WordPress create during the upload process, exactly?
This depends on the size of the Original image…
- If the Original image is bigger than the Large Size dimensions set in the Media size options, 4 images will be saved on the server: a Thumbnail version, a Medium version, a Large version, and the original image itself.
- WordPress uses a downsizing function to create the Thumbnail, Medium and Large versions. WordPress never “upsizes” images – ie, it never creates a version larger than the original image size. Therefore, if the Original image is smaller than the Large Size dimensions, a Large Size version is not created.
- If the Original image is smaller than the Medium Size dimensions, neither Medium nor Large Size versions will be created.
- The Original image is identified as “Full Size” in the Media pop-up screen.
- The Thumbnail, Medium and Large Size images are named using the original filename plus the actual dimensions of the resulting image size. (See table below for examples.)
Default image sizes – dimensions and filenaming
As mentioned earlier, the dimensions of the resulting image sizes are appended to the Original file’s filename to create the filenames for the three sizes.
For example, uploading a 1200px x 1200px image named myimage.jpg will result in 3 files being saved in the relevant wp-content/uploads folder, in additional to the Full Size original:
- The Thumbnail Size version will be named myimage-150×150.jpg
- The Medium Size version will be named myimage-300×300.jpg
- The Large Size version will be named myimage-1024×1024.jpg
Note that, in the above example, the additional image sizes preserve the 1:1 aspect ratio of the original image (1200px x 1200px), which is why the dimensions of the resulting image appended to the original file name happen to correspond to the default Media sizes. In most real world examples the aspect ratio of the Original image will not be 1:1, meaning that the appended dimensions will be different to those shown above.
The following table gives some further examples for a variety of different original image sizes. In all cases, for simplicity, the examples assume the default Media sizes are used, as set in Dashboard > Settings > Media:
| Ex: | Original image dimensions width x height |
Default Media | Images created on the server |
|---|---|---|---|
| 1. | myimage.jpg, 1200px x 1200px | Thumbnail Medium Large Full Size |
myimage-150×150.jpg myimage-300×300.jpg myimage-1024×1024.jpg myimage.jpg |
| 2. | myimage.jpg, 900px x 900px | Thumbnail Medium Large Full Size |
myimage-150×150.jpg myimage-300×300.jpg – myimage.jpg |
| 3. | myimage.jpg, 500px x 250px | Thumbnail (crop unchecked) Medium Large Full Size |
myimage-150×75.jpg myimage-300×150.jpg – myimage.jpg |
| 4. | myimage.jpg, 1200px x 600px * | Thumbnail (crop checked) Medium Large Full Size |
myimage-150×150.jpg myimage-300×150.jpg myimage-1024×506.jpg myimage.jpg |
Some points to note:
- Ex.1: The original image is larger than the Large Size dimensions, therefore 3 additional image sizes are created by WordPress, in addition to the original image.
- Ex.2: The original image size is smaller than the Large Size dimensions, therefore no Large Size image is created.
- Ex.3: The original image size is smaller than the Medium Size dimensions, therefore neither a Medium nor a Large Size image is created. Only two images will be placed on the server – the Thumbnail and the Full Size (original) images. As the Thumbnail box is unchecked, the resulting Thumbnail size is proportional (ie “box resize” method”), which is reflected in the dimensions appended to this size.
- Ex.4: In this example the original image is rectangular (with an aspect ratio of 2:1), and we see WordPress preserves this aspect ratio during the downsizing. Note that the dimensions appended to the filename reflect the actual dimensions of the new images.
- Ex.4: This example assumes that the “crop” checkbox in the Media Settings has been checked. Therefore, for the Thumbnail Size, the original aspect ratio is ignored and a thumbnail of exactly 150px x 150px is created. If the checkbox is unchecked, the aspect ratio is preserved and the Thumbnail Size image will be, in this example, 150px x 75px.
Featured Image basics
Activating the Featured Image functionality
Featured Images are not enabled automatically. This functionality needs to be enabled in your theme, which you do by adding this code somewhere in your theme’s functions.php:
add_theme_support('post-thumbnails');
If you now go to the Post or Page Editor you should see a Featured Image box on the right hand side of the screen:

Featured Image box in Post/Page Editor
Click on the “Set featured image” link to launch the Media Uploader where you can either upload a new image and set it as the Featured Image, or select an existing image from the Post/Page gallery or Media library. Bear in mind that setting a Featured Image in the Post/Page Editor only registers a particular Original image as the Featured Image for that post – it doesn’t select any specific image size for display. Read on to learn more…
Displaying the Featured Image
The following function is used to display the Featured Image:
This code should be used in the relevant theme template within the Loop. More information about this function can be found on the Codex here.
Setting a default size for the Featured Image
By default, the the_post_thumbnail() function displays the registered “post-thumbnail” size of
your Featured Image. Please note that “post-thumbnail” is not the same thing as the Thumbnail Size that we discussed earlier. Yes, I know, this is confusing, just bear with me…
The “post-thumbnail” image size is registered using the set_post_thumbnail_size() function. This function takes 3 arguments: $width, $height and $crop_flag and, for example, is used in your theme’s functions.php like this if you want to specify a “post-thumbnail” size of 100px by 100px, with “hard cropping”:
set_post_thumbnail_size( 100, 100, true );
Our functions.php code now looks like this:
add_theme_support('post-thumbnails');
set_post_thumbnail_size( 100, 100, true );
Obviously, you don’t have to use 100px x 100px, so change the functions parameters to suit your theme layout/design.
If you don’t specify a “post-thumbnail” size using set_post_thumbnail_size(), the Original image will be displayed – which is probably NOT what you want. We’ll look at a better way of handling the display of Featured Images next…
Using add_image_size() to customise the Featured Image
As mentioned above, the set_post_thumbnail_size() function doesn’t, as at WordPress version 3.0.1, actually resize the image – it just resizes it in the browser. Although it is quite likely that on-the-fly resizing will be possible in a future version of WordPress, until this is implemented I don’t recommend using this function. Instead, I prefer creating any additional image sizes at the Media upload process, by using the add_image_size() function:
add_image_size( $name, $width, $height, $crop);
Once you have added this function to your theme’s functions.php your new image sizes will be created alongside the default Thumbnail, Medium and Large sizes during the Media upload process.
Configuring the add_image_size() function
Let’s take a closer look at this functions parameters…
- $name: a unique name for your image size, eg “Home page”, or “Archive page” or something similar
- $width: the width, in pixels, of this image size
- $height: the height, in pixels, of this image size
- $crop: true to indicate “hard cropping” or false to indicate “box resize”. Review this section of this article if you’re not sure of the difference between the two.
For example, to specify a new image size called “Home page”, sized at 120px x 120px, and hard cropped, this is what you would add to your theme’s functions.php:
add_image_size('Home page', 120, 120, true);
Or perhaps you prefer to create a new image size of 300px x 150px without “hard cropping”:
add_image_size('Special archive', 300, 150, false);
And, of course, there is nothing stopping you adding several image sizes, each of which will be used in different parts of your theme:
add_image_size('Home Top', 120, 120, true);
add_image_size('Home bottom', 270, 90, false);
add_image_size('Archive thumb', 150, 75, true);
add_image_size('Special', 397, 224, true);
Just remember that this code goes in your theme’s functions.php.
Displaying the additional image sizes in your theme
You can now reference these new additional image sizes in your theme template files using the the_post_thumbnail(); function discussed here, for example like this:
We should not forget about the default Media sizes either. You can display these in the same way, like this:
the_post_thumbnail('medium'): // The Medium Size version
Or this:
the_post_thumbnail('large'): // The Large Size version
Or this:
the_post_thumbnail('thumbnail'): // The Thumbnail Size version
Remember – this code should go within the Loop in the relevant theme template file.
The important advantages of going to all this trouble to create additional image sizes using add_image_size(), rather than use set_post_thumbnail_size(), are:
- add_image_size() creates an image at the correct size – no more browser resizing.
- You can use add_image_size() as many times as you like to specify a range of image sizes for use in your theme.
Dealing with images already on the server
The function add_image_size() will only create additional images for new uploads. Therefore, if you want to retroactively create the new additional images for previously uplaoded images, your best option is to use the rather wonderful Regenerate Thumbnails plugin. Highly recommended!
Examples using add_image_size()
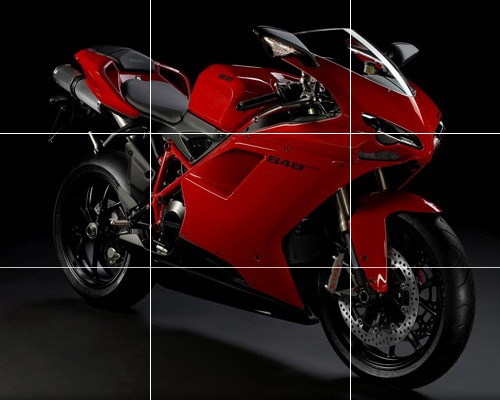
Finally, here is a series of test images to demonstrate the results of using various image sizes and, in particular, the two cropping options of the add_image_size() function.
Each example shows the add_image_size() code used to generate the image. The Original image is 600px x 400px. Note “thirds” grid superimposed on the Original image to help indicate what has been cropped during the creation of various image sizes.
Original image
Original Size: 600px x 400px
Original Aspect ratio: 3:2

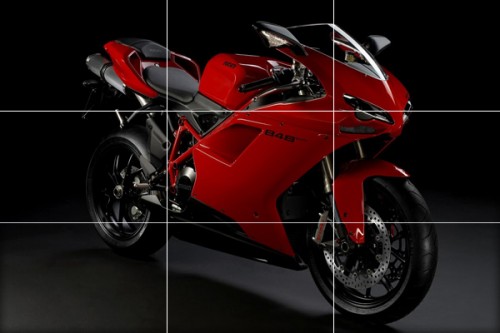
Added size: 500 x 500, hard cropped
Resulting Size: 500px x 400px
Resulting Aspect ratio: 5:4
Image has been cropped (left and right)
add_image_size( 'Test cropped', 500, 500, true );
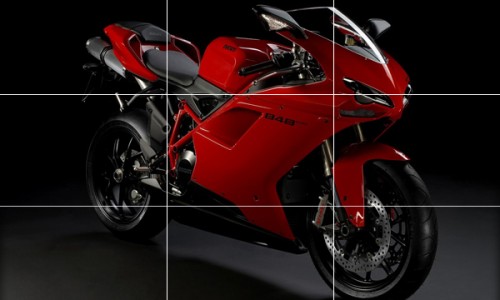
Added size: 500 x 500, box resize
Resulting Size: 500px x 333px
Resulting Aspect ratio: 3:2 (same as Original)
Image has been resized to fit in “box”, original aspect ratio is preserved, not cropped
add_image_size( 'Test box resize', 500, 500, false );
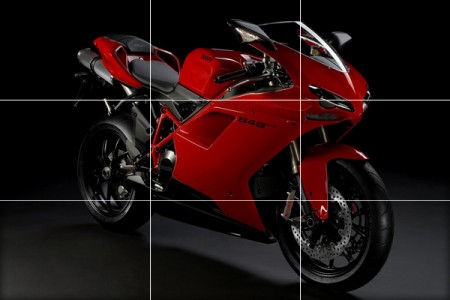
Added size: 500 x 300, hard cropped
Resulting Size: 500px x 300px
Resulting Aspect ratio: 5:3
Image has been cropped (top and bottom)
add_image_size( 'Smaller Test cropped', 500, 300, true );
Added size: 500 x 300, box resize
Resulting Size: 450px x 300px
Resulting Aspect ratio: 3:2 (same as Original)
Image has been resized to fit in “box”, original aspect ratio is preserved, not cropped
add_image_size( 'Smaller Test resize', 500, 300, false );
Added size: 100 x 100, hard cropped
Resulting Size: 100px x 100px
Resulting Aspect ratio: 1:1
Image has been cropped (left and right)

add_image_size( 'Thumb Test cropped', 100, 100, true );
Added size: 100 x 75, hard cropped
Resulting Size: 100px x 75px
Resulting Aspect ratio: 4:3
Image has been cropped (left and right)

add_image_size( 'Smaller Thumb Test cropped', 100, 75, true );
Added size: 100 x 75, box resize
Resulting Size: 100px x 66px
Resulting Aspect ratio: 3:2 (same as Original)
Image has been resized to fit in “box”, original aspect ratio is preserved, not cropped

add_image_size( 'Smaller Thumb Test cropped', 100, 75, false );
Conclusion
As can be seen from the above examples, choose your additional image sizes wisely in order to make sure you get the results you want.
Let’s finish by listing the key points to take away from all of this…
- You can easily customise the default Media sizes by changing the default sizes in Dashboard > Settings > Media.
- To use the Featured Image functionality, you need to add the add_theme_support(‘post-thumbnails’); code to your theme’s functions.php.
- Avoid using set_post_thumbnail_size() to set your Featured Image display size – to avoid in-browser resizing
- Add your own additional image sizes using add_image_size();
- Use the Regenerate Thumbnails plugin to create the new additional image sizes for images which already exist on your server
- Choose your cropping options wisely when using add_image_size();
- Use the “box resize” method if you want to preserve the original aspect ratio of your original image and not have it cropped.
Hope this is useful to someone – it took ages to write!
Enjoy!
Want to know how to stop WordPress from automatically creating default image sizes, ie the thumbnail, medium and large sizes, during the upload “crunching” process? Check out my new Remove WordPress default media image sizes article!
Related articles:
- Wordpress Featured Images - add_image_size() resizing and cropping demo
- Remove WordPress default media image sizes
- WordPress - List all image sizes in Media Uploader


Excellent and very clear article. Thank you very much for making the effort because it really looks like a lot of work!
Michael
Thanks, Michael. Glad you found it useful. 🙂
Thanks so much for taking the time to write this article. I have a much better understanding of how WP handles images. However, I’m still having a bit of trouble.
I’m using the Hybrid News theme for a new site, including the featured story slider which takes the featured image and puts it into a box that’s 230 x 200.
The problem I’m having is that it’s not doing either the hard or soft crop, and the result is that large images are smooshed into the box, and smaller images are stretched to fit.
Per your tutorial, I added the add_image_size() function to my functions.php file like this:
add_theme_support(‘post-thumbnails’);
add_image_size(‘Home page’, 230, 200, true);
And added “” to the loop of the theme template page.
But, I’m not seeing the new ‘Home page’ size anywhere when I upload a new image. I still just see ‘thumbnail,’ ‘medium,’ ‘large’ and ‘full size’ in the upload dialog.
I have a feeling I’m not doing something right. If you have a minute to clue me in, I’d be most grateful.
Thanks again.
Russ
Russ,
You won’t see your new size listed in the Media Uploader. Hopefully a future version of WP will address this.
Assuming you are calling the new size correctly in your template file:
< ?php the_post_thumbnail('Home page'); ?>and you have selected the image as the Featured Image, you should see your correctly sized version.
As mentioned in the article, if you uploaded the image prior to adding the add_image_size code, you need to regenerate your images using the Regenerate Thumbnails plugin.
Thanks so much for your help. I think I’ve got it working now. Much appreciated!!
Do you know if it is possible to amend to functions.php file to default the medium and large images to be hard cropped?
Good question, Duncan.
Looking through the WP code, there doesn’t seem to be a way to filter the “crop” option in the relevant media functions. So, the short answer is no.
The longer answer is this:
If a future WP version was to show all added image sizes in the Media Uplaoder (which it doesn’t currently), you could add your own cropped Medium image size using add_image_size, then directly insert this into the post.
Thank you for a really well-disposed and detailed post on image resizing. You are a great technical writer, writing with clarity and an eye for disposition. I got more out of this post than from a whole WP developer book!
I got some ideas on how to include add_image_size(); for image sliders by reading this and that was just what I was looking for!
Thanks for the nice words! I’m glad that you enjoyed the article and you found it useful. 🙂
Thanks for laying this out so concisely. I’m dealing with a situation where I want to grab the post thumbnail for a post, but only if it’s of the type that I’ve specified in the add_image_size function.
Can you think of a way to set up a conditional that will check for the existence of a certain image size? Unfortunately, has_post_thumbnail doesn’t work because it will return true if there is _any_ image attached to a post; no way to specify a custom size.
Thanks again.
Jesse,
I’ve got some code lying around somewhere that does this. I’ll dig it out and post back. 🙂
It was closer to hand than I thought 😉
$id is the post ID.
You can then check $image, ie if ($image ) and go from there.
Thanks. Finally I understand how to place the thumbnail version of the featured image on my home.
Good work with pictures and main-structure of content. This article should be found “closer” at the wp-forum.
Excellent, and very detailed post!
Is there a way to dynamically re-size images?
I place my featured images in the sidebar, and they come in various sizes, so I do not want to crop to a certain HxW.
Thanks.
Thanks for the comment. 🙂
Dynamically resize? No, currently WP doesn’t resize on the fly, only during upload. I did read somewhere that this was being planned for the future.
In the meantime, if you use something like this (and this image size doesn’t exist):
width and height attributes will be set to these dimensions and the browser will resize the image – which may look rubbish depending on the source image.
So, my advice is plan your image sizes at the outset and decide whether or not to use hard crop or box resize in your add_image_size() declaration.
Thank you so much Ade, you have made my life so much easier today. It is so great that you take the time to write this article, you make it very clear to understand, even for me who is a designer, not programmer. I am volunteering at the mo, making a site for a charity, and I am using your help to make this happen, so in effect your time spent on this article is directly helping me, and then the charity I am helping, so nice one! Peace…
Thanks so much Ade!
Been pulling my hair out over this! Cant thank you enough for your well written and informative post!
Thanks once again.
Thanks for your feedback, Aaron.
Glad you found the article useful. 🙂
Excellent overview. Thanks for taking the time to assemble it.
Hi, I’m trying to adjust the size of my images to 700px, but the max that it displays is 600. even if I write the code below. my css image container is set to 700px as well.
add_image_size( 'single-post-thumbnail', 700, 9999 ); // Permalink thumbnail sizei tried to change the value to less than 600px.. like 300px. and it worked. but no more than 600px.
what could be wrong?
Check that you don’t have some other CSS constraining the image when displayed on your page. Firebug is a great tool for diagnosing this sort of thing.
Also, just to make sure your add_image_size is working properly, use FTP to check the contents of the relevant wp-content/uploads folder to see if your new image size exists.
This was incredibly helpful, thank you so much!
Thanks a bunch! That’s what I was looking for! Excellent tutorial.
really informative and well-written post, well done!
This article has some good points in it but it fails to solve one problem I have with the media uploader. That is this. I upload an image and I get 7 copies of that image stored. I might only use one size one time. that is a lot of wasted junk that gets stored. There has got to be a better way. How do you get rid of those images? How do you force wordpress to only create the images you want and not the ones you don’t. I think there should be a way to stop wordpress from creating the 150 x 150, 300 x 300 and 1024 x 124. I would like to set the exact sizes in the functions.php file and if that image isn’t defined, then it should just upload the image as is without cropping or creating new images. Write that article!
Great job man, thank you for your efforts. I was fortunate to have found this post! This gives the blog a certain elegance and this is something that can be replicated over and over and over. Thanks a million.
Thanks, David! I appreciate the comments. 🙂
Hi,
Is it possible to avoid the resizing (crop) on a featured image?
i’m using the structure theme (via a wordpress.com) and because of the resizing, the .gif are not displayed nicely (they stand still).
My gif is 620×380 which is the 100% size to use if i’m wright…
Do I need to run on a stand alone wordpress blog or is there any solution to make it work (css?).
Could you help me please?
I had a look to all your nice post but I didn’t find the solution.
thnx a lot by advance.
f.
Hi there. I just wanted to say that your post is really helpful.
I never really ‘got’ the whole featured image thing but I really wanted to find out.
Especially the part I never really understood was the hard crop vs box resize thing with the true or false at the end. Also the different sizing options and how you can name them. It makes sense to me now.
I just wanted to say THANKS for this article, its really well written 🙂 thank you thank you p.s up look pretty cool playing that guitar :p
Simon
Cheers, Simon! Glad you found it useful. 🙂
Really clear and useful article… 5/5
thanks
Glad you found it useful! 🙂
This is an excellent article. Thanks for taking the time to publish this.
Biggest win for me = your reference to the Regenerate Thumbnails plugin.
Thanks!
Yep, Regenerate Thumbnails is an excellent and very useful plugin. 🙂
Yes, still very clear and useful. Thanks.
(Not *completely* connected to your post, but you sure seem like an expert now so might be able to help!)
I’m writing a plugin and I want users to be able to upload an image, then crop it to a certain dimension (and be a square).
The custom header stuff would be perfect if I could utilize that here, but haven’t had any luck.
any ideas? point me in the right direction? 🙂
thanks
Look again at the section in the article on add_image_size(). This function will create your cropped version of the uploaded image.
Hope this helps.
Is there a way to do so that you can choose individual alignments for the thumbnails so that you can have a couple of thumbnails to the left of the text and some to the right for example. In order for the thumbnails to look less standardized on the homepage.
So glad I found this well written article. I love WordPress!
This article was a lifesaver… thanks so much for putting it together – been awhile since I’ve seen such useful great content – CHEERS! =)
Thanks for the comment. Glad you found the article useful.
Is there a way to do so that you can choose individual alignments for the thumbnails so that you can have a couple of thumbnails to the left of the text and some to the right for example. In order for the thumbnails to look less standardized on the homepage.
Thanks
Erik!
Erik,
I think there is a filter which will enable you to add a CSS class to the IMG tag. Not entirely sure about this though…
How can I set the crop position of any sizes(thumbnail, medium or large) in the functions.php? I don´t want change the code of the media.php, becouse if I update the wordpress, I will lost this setting. This is possible? Someone know how to do this? Thanks.
Julio,
What do you mean by “crop position”? As far as I know, WP only crops from the centre, therefore trims from all four sides as necessary.
I haven’t looked, but there may be a filter in the relevant core function which enables you to change this.
I’ve posted a solution to the crop position problem at http://bradt.ca/archives/image-crop-position-in-wordpress/
Thanks, Brad! Great patch and thanks for posting your link here.
Cheers! 🙂
Amazing dude. “Using add_image_size() to customise the Featured Image” part is exactly what I was looking for. Way to be a beast.
blimey, this is really really useful. Explains everything that the codex should!
Glad you found it useful. 🙂
Thanks for the detailed tutorial. It is absolutely great!!
I’ve got a little question though: what would you do, after changing some of the default sizes (on a blog that already has been running for sometime) , to apply these changes to all the images you already have on your server?
I’ve thought about applying a batch resize process using Imagemagick, but… would the resized images be used by my blog, or do I have to upload them one by one again on the WordPress CMS Media Manager?
Hi,
Glad you found the article useful.
In answer to your question, simply install and run the excellent Regenerate Thumbnails plugin. This will grab all existing image attachments and generate your new image sizes. Once done, deactivate the plugin. Next time you add a new image size, re-run the plugin.
Works perfectly.
Uauh, that looks really promising. I’ll check it out and let you know what happens. Thank you so much for your help and your quick answer 😉
This post has been of great help, thank you so much.
I have added the size I need for my thumbnails, bus is there a way to prevent wordpress from making the medium and large versions of the images by default?
Again thank you for this wonderful post.
Amazing post. Really informative and exactly the level of detail I needed to truly understand what WordPress does when I upload an image and why the seemingly random calls to add_image_size() and the_post_thumbnail() in the theme I’m working on weren’t producing the results I expected! 🙂
Now I feel I understand at least a tiny piece of the monster that is WordPress.
Your writing style is clear and concise and you remove some nagging questions a reader might have on some points with those little information boxes. Also, it’s one of the few articles I’ve read where I’ve come away without a question or perhaps wondering; “yes, but what if you don’t call function X() and use the defaults of function Y()—what happens then?” You covered all of the questions riased as I read your post.
Thank you.
Thanks, Carl! I appreciate your kind comments and I’m glad you found the article useful. 🙂
This is by far the most useful WordPress tutorial I have come across so far. I was literally pulling my hair out trying to understand the most efficient way to generate homepage sliders using the featured images of posts… Thanks to you, my theme is now well on its way, with a fantastic slider that has its own images to access!
I really cannot thank you enough for this post, I have really learnt so much useful information!! <3
Cool! Glad it was useful. 🙂
Hi Ade,
Fantastic article, very easy to understand and I’ve sucessfully implemented this in my website.. One thing though – I need to specify the image size in em’s for my responsive web design. I’ve tried just typing
add_image_size( ‘recent-post-thumbnail’, 12em, 9999 );
but this just throws up an error – any idea how I can get around this?
Many thanks,
Sam
Hi Sam,
Glad you found the article useful.
As far as I know, add_image_size only takes dimensions in pixels, hence the error you are experiencing. There isn’t a workaround – other than to abandon using ems for image dimensions.
Ok well thanks anyway for the quick reply!
Completely agree with all the praise – it was a joy to come across such a clear and methodical article.
But – my question is the same as the rather rude one asked by Jamie in April: is there any way to stop wordpress creating so many sizes on upload?
I want to allow my client to upload a background image. And there is really no point in generating all the other smaller sizes. So is there any way in stopping all the sizes being crunched in just one image upload box in a custom post type? I would still like all the sizes to be generated in normal uploads.
I know it may not be possible, but I just wondered if you might know.
Thanks
Frances
Hi Frances,
Glad you found the article useful.
As for your your question, I don’t have an answer to hand, but it should be possible. There is no easy to use function to deal with this, but all image sizes are held in a global variable called $_wp_additional_image_sizes and can be filtered using a filter named intermediate_image_sizes, located in the function get_intermediate_image_sizes(). As far as I can tell, this function is called whenever an image is uploaded via the uploader.
I’ll play around with this and post back with the results of my findings…
That would be fantastic. Though I am a wordpress newbie, I will also give it a try now that you have pointed me in the right direction and if I come up with anything (not so likely!), I will also post back.
Thanks a lot.
This will get you halfway there:
Remove WordPress default media image sizes
Unfortunately, doing this on a post type basis doesn’t seem to be possible.
Thanks for the great information. I have been banging my head senselessly trying to understand this. I think I got it, but my featured images are still coming up huge.
I am using Elegant Themes Deep Focus theme (http://www.elegantthemes.com/gallery/deepfocus/). Their functions.php reference a separate php file that establishes the thumbnails…
post_thumbnails_deepfocus.php contains the code:
<?php
add_theme_support( 'post-thumbnails' );
add_image_size(650, 1024, false);
I established the parameters 650 and 1024 and the image is being created. The only thing is it is not being displayed in the post. An additional image is being created with wacky dimensions (650×1903). My original image is 2854 × 1903.
The following sizes are created when the image is uploaded:
150 x 100 – small
650 x 433 – my new definition
1024 x 682 – large
2854 × 1903 – original
650×1903 – the one posted in the post. This also has some additional characters appended to the file name.
I looked for where the image is referenced… Is it page-blog.php? If so, the only code that I found seems to be using timthumb.
Any direction would be greatly appreciate. I think I am finally on the cusp of getting this but need a bit more help.
Thank you so much in advance.
Rick Ruddle
Follow-up…
I did some more testing today and the wacky-sized image is not being created when the media is uploaded, but created when the blog post is created. I found if I create a blog post, a 180 x 180 image is created for the blog index page. If I remove the blog categorization and list it as a portfolio post, a new “cropped” thumbnail is created with the original images height. So something must be creating these images dynamically. Is it timthumb?
I found code in the page.php, single.php, page-blog.php files:
Is this where the wacky sizing is being done? I searched all of my directories and can’t find any timthumb php files. I am confused.
Any direction?
Hi,
This kind of support is beyond the scope of what I can provide for free. You are probably better off getting support from your theme’s authors – they know their theme much better than I do.
However…
Look at the code in single.php and see how it is pulling in the image. As for timthumb, do you have a file called timthumb.php somewhere in your theme’s folder?
Contact the theme author -he/she should be able to sort this out for you in no time. 🙂
Thank you for the reply. I have been trying to communicate this issue with them. I did get feedback that timthumb is not being used.
Hello,
I’ve tried the WordPress forum, but so far no one has been able to help. Since this is the best post I’ve found on WordPress thumbnails – much clearer than the one in the WP codex – I’m asking for help here. If at all possible, that’d be much appreciated.
Since changing hosting companies (three days ago), WP is only uploading *one* featured image size: full-size, which is then resized by browsers (as per functions.php, I assume) to look like thumbnails. Any suggestions as to why this may be happening?
Everything was working well before. I’ve even tried the Regenerate Thumbnails plugin, but no luck. The regenerated thumbnail is “broken” and the only uploaded image is the full-sized one. And NO editing options, either.
Could it be a memory issue (it’s an upper-level VPS server)? WP Permissions on the server level? Any suggestions? Just in case, below is the site’s functions.php code pertaining to thumbnails:
Any assistance/suggestions would be much appreciated.
if ( !function_exists( ‘my_theme_support’ ) ) :
function my_theme_support() {
add_theme_support( ‘post-thumbnails’ );
add_image_size( ‘custom_thumb’, 150, 150, true);
}
endif;
add_action( ‘after_setup_theme’, ‘my_theme_support’ );
add_filter( ‘post_thumbnail_size’, ‘my_post_image_size’ );
function my_post_image_size( $size ) {
$size = ‘custom_thumb’;
return $size;
}
if (function_exists(‘add_filter’))
add_filter( ‘the_excerpt’, ‘excerpt_thumbnail’ );
function excerpt_thumbnail($excerpt){
if(is_single()) return $excerpt;
global $post;
if ( has_post_thumbnail() ) {
$img .= ‘ID).'”>’.get_the_post_thumbnail($post->ID, ‘custom_thumb’).’‘;
} else {
$img = ”;
}
return $img.$excerpt;
}
The matter has been resolved. A media library file was missing from the VPS server. It’s been installed, and now everything is working as it should.
I am designing my new blog and I am an alien to programming. I want to display a 150×150 box on home page and a larger image in the post body. I am facing various problems.
1. When I add a feature image, it appears on the home page as 150×150 which is fine but the large image does not appear in the post body.
2. When I insert the image in the post body and use an image as featured image then both of them appear on the home page (index.php)
3. None of the images on home page are linking to my post.
Please help.
This isn’t a “free theme design support forum” so I can only give you a general tip… 😉
Use a home.php file for your home page and code it as needed to pull in the 150×150 image. Leave index.php for displaying archives, etc.
Hello,
Thanks for all this, really helpful!
Was aware you could create custom images sizes but didn’t realize you then specify which ones to pull in with the post thumbnail… been battling with CSS to try and do this for ages, doh!
Thanks again 🙂
You’re welcome. Glad it was useful. 🙂
Hi everyone, this is an excellent article but I got a little problem. When I apply the add_image_size function, it do crop my images to the size I want, but, for example, if I previously edited the image using WordPress (by using “Scale image” or “cut image” once I have uploaded the image to the multimedia folder, the function resizes the original image and not the one I have modified. So what can I do? I want the modified image resized to show specific parts of the image, but it does not happen because the function crop the original file of the image.
if you could help me to solve this!
many thanks!
Regards!
I don’t think there’s a way around this, Ricardo. If you need to re-scale or crop the image, you should do it before uploading. The add_image_size() just creates new versions of the original image.
Many thanks! I wanted to know that. So I take note of this to use it in our theme. Many thanks!
Regards!
R.
You’re welcome! Glad you found the article useful. 🙂
this is a great article, thanks for putting it together.
This sure has been very useful to me. Thanks 🙂
Fantastic! Thank you so much.
Great article, extremely clear.
@Paul Wiliamson, Sabrina, Joseph, Cristian Demetriad
Thanks! Glad you found it useful. 🙂
Great article! Great website throughout! Thanks for putting this all together!
Thanks! Appreciate the nice words. 🙂
Nicely written article. This is an area that can be confusing and your description lays it out very clearly.
I arrived here on a quest to find a way to automatically deal with images when a change is made to the content width of my site. I like the photos to take the full width of the content. If today the content is 500px and I set the media options for “Large size” to be proper for that and upload my photos all is good. If I make a change, and the content goes to 600px wide and I reset the media options for “Large size” to work with that and then run the Regenerate Thumbnails plugin I would like the new size to be used. Basically, WP needs to reference the file by the name of the file size instead of by the resolution of the file, or, store them as “myimage-thumbnail.jpg” instead of “myimage-250×250.jpg”. Do you know of a way to do this?
As an FYI, I am using the Genesis framework on the site that I am working on this problem for.
Thanks!
Amazing. Thank you! Very helpful as I needed to just have a size or two for the client to choose from so they don’t muck stuff up!
Excelent article! Thank you very much for posting. I really wish I had found this a few weeks ago when I started work on my page.
Thanks for the comments, Eric, HerbyDerby and Dave. Glad you found it useful.
@ Dave
No, I don’t know a way to change the image filename without replacing existing WP core functions.
I’ve coded WP for quite a while and never knew half of what you laid out here.
Excellent work. You just made my day.
Thanks! Glad it was useful. 🙂
I was wondering if it’s possible to assign % rather than px dimensions?
No, not with add_image_size. You could look at wp_get_attachment_image_src() then build your html from that.
Straight and clear. Thanks.
Wow! This is probably one of the best tutorials I’ve ever seen. And it covers EVERYTHING any WP developer should know about featured images. Thanks.
Thanks! Glad you found it useful.
Thanks so much! Just the clarity I needed..
I thought I’d mention – I was having trouble getting
add_image_size( 'Tiny', 80, 80, true );to hard crop my Tiny thumbnail, and found the solution here: Otto at WordPress Forumadd_action( 'after_setup_theme', 'theme_setup' );
function theme_setup() {
add_image_size( 'theme-custom-size', 100, 100, true );
}
I have one question, though… do you know of a way to use the WordPress’ Featured Image Editor to recrop my new image size (only)? The options avilable in WP 3.3.1 are:
Apply changes to:
* All
* Thumbnail
* All except Thumbnail
I’m on a hunt for a plugin as I type…
Thanks again! Tim
Tim,
Personally, I am able to use add_image_size() directly in a theme’s functions.php without problems, but I can see that in some circumstances adding it via the after_setup_theme hook makes sense and may be necessary.
Re your question: I don’t have an answer, but I am sure it is possible to list all image sizes in this screen. You will either have to find a plugin which has done this already, or trawl through the core files to see what needs to be done. Sorry, I don’t have an easy solution for you.
Ade,
Thanks for the great article. I am a WP novice and not a coder so it is easy for me to get lost.
One question. I have uploaded a Featured Image that is 90 x 97 and then tried to resize it to 80 x 86. No matter what I do I can’t seem to get the system to use this new size as the Featured Image even if I go to the original post and remove the Featured Image and choose the newly sized one as a new Featured Image.
Also, can you give me a general idea of your hourly rates. I might be interested in some help on this site. It is about 75% done but needs some further work. Thanks You.
Mark Jones
San Francisco, Calif.
Hi Mark,
Glad you found the article useful. 🙂
Re paid work, plesae contact me via ade [at] studiograsshopper [dot] ch
Thanks.
Great article and very easy to follow!! This is exactly what i’ve been looking for hours! Thank you so much for sharing your knowledge!
You’re welcome! Glad you found it useful. 🙂
Very nice and informative post! But can you really specify as many image sizes as you want? I thought four was the limit. In my experience, adding more image sizes than four does not result in anything.
Hi,
Yes, you can add as many as you like. The only downside is that the image upload process takes longer due to having to create more image sizes.
Of course, you need to code your theme so that it displays these different image sizes.
Remember, any new image size added ONLY affects images uploaded from then on. You need to use the Regenerate Thumbnails plugin to generate the new image sizes for existing images.
Hi,
When I upload a larger image 1200 x 1000 and resize it in wordpress post to Medium 500×300, I noticed when loading pages and post that any images shows up as a much smaller file size (20-60kb)than the actual file (600-800kb). However, when one double click on the images, it opens up the actual file, which is much larger.
My questions is, when the pages are being loaded on the browser, does it pull 20-60kb small images or does it actually pull the actual file size of 600-800kb. I am trying to determine the kb size of photo I should be using on my blog as I am concern about load time for slower devices/connections. If the real impact is 20-60kb per images (even when the file size is 600+), then my concern is not an issue. However, if the real impact is 600-800kb actual file size, then I would have to further compress the file and degrade the quality of the images.
This is one of the nicest articles I have ever read and occasionally I find myself coming here every now and again to read it again if I need to have my memory refreshed about image sizes, soft and hard crop.
Cool! Thanks!
“The function add_image_size() will only create additional images for new uploads.”
Why have I never found this simple statement anywhere else that I’ve been looking. I spent hours trying to work out what was wrong with my code and why my new image sizes were not showing up on the test page!
Thanks for a great article.
Glad you found it useful!
excuse me, but this is the end of the very first sentence in reference add_image_size
How could You have miss this?
Hi,
People miss stuff. C’est la vie. Relax, it’s no biggie! 🙂
I would like to know which function exactly is creating resized or cropped images from source image. I have a script which downloads movie image from IMDB if I give it IMDB code, the script also adds image as featured image but the problem is that those images are not resized so they are breaking page layout.
You would need to ensure that your download script hooks in to the relevant image resizing functions. You will need to dig through WP source code to find the relevant functions and filters.
I don’t understand how to create a fixed height and variable width.
thanks 😉
Make the add_image_size() width argument a really big number and set hard crop to FALSE.
Hi, thanks for all the explanations.
I am not sure though how to do for this:
– I now have a large, medium and thumb sizae where the thumb is a 150×150 square, so we manually crop the image while upload.
I want to add a “mini” size that would be a 54×54 version of the thumb, buut retaint he same cropping.
If I add this in the” function file, I think it will calculate it from the original iamge, and not the crop, is that right, so I am not sure what to do…
Correct. Currently (WP 3.3+), the add_image_size always applies to the original file, not any subsequent resize of the file. This may change in a future WP version…
One way around this is to upload the original file, then re-upload the resized version. This has some drawbacks, but is probably the only way to deal with this situation.
Great Article…
BTW I think your post sharing buttons are not working..
Great great great! Been looking with my friend, Google, for exactly this information. I am planning to figure out (I am new at all this coding business) how to incorporate wordpress image resizing with the Filament Groups https://github.com/filamentgroup/Responsive-Images/tree/cookie-driven#readme solution for serving images based on the browser dimensions.
I believe with the information you provided and explained about I can get the naming conventions down to use with their script, and then with a few modifications to their code to allow more than two versions.
The problem I am aiming to solve with this is: How do I get images uploaded by my clients to be available automatically as optimized sized images, without having the client resize and upload/ rename/ etc… the images beforehand?
Thanks for your post. Seriously really helpful.
-DK
Indeed, it was really useful and understandable. Just great. Thanks!
Hell yeah! This opens up a lot of possibilities for me! It’s exactly what I needed! Thanks a lot!
Thank you! I have a few entries in my functions file without fully understanding them. This is extremely helpful!
good effort
Thanks for such a great and comprehensive article. Exactly what I required!
Great article. Hopefully this thread is still active, because I’ve been pulling my hair out over the “hard-crop” functionality. Does anyone out there know if there is a solution to do an actual hard-crop when generating the thumbnails? In other words, can the full-size version of the image be cropped down to the dimensions specified, without any resizing? I’d love to generate several versions of all of the images that are uploaded on my client’s site and have some of them be cropped-down versions of the full-size version.
Thoughts?
Hi,
Glad you found the article useful.
Once you have uploaded the image you cabn edit it and crop it. This isn’t quite what you’re looking for, however, as the original image remains uncropped.
Dear Ade,
Thank you for your article, very precise and easy to absorb. I’ve read trough the thread of comments to finds out if I’m the first to ask this, and I believe I am.
Is it possible to ‘soft crop’ images during upload? I want my featured images to first be scaled so that it will be the smalles possible size but still fill my 300x300px box completely. and then crop whatever doesn’t fit.
For example: a 600×1200 image should first resize to 300×600 and then be cropped to 300×300. I could really use this functionality in a grid view design of posts with image backgrounds.
Any ideas?
As far as I know there isn’t a way of doing this.
I assume that using Hard Crop and a 300px x 300px image size doesn’t give you what you want.
Incredibly awesome… Thanks for sharing such wonderful details on post thumbnails.. I have been using timthumb and thats a headache for some projects. Thanks alot.!!
Thanks a bunch !!!
HIya,
Thanks v. much for this article. I’ve been using it as a reference for years now. I really should know how WP handles featured images by now, but it seems to be the one thing that my brain (annoyingly) keeps pushing out of my head to make way for newer stuff xD
Anyway, this post continues to be my reference whenever I reach for the_post_thumbnail();
Cheers!
Cool!
Quite a few things have changed in WP 3.5 so I’ll be updating some of this info in future.
Thank you.
i was searching for a solution to crop image size changing for 2 days. finally i found it here. thanks lot.
perfect!
Great post. It is really well written, thanks.
Hey!
First of all I have to say, that it really helped me out a lot!
But i got 1 issue during all this resizing stuff.
I did a template on my own, we I got 3 different image sizes on one Page:
1x Top Post Image // 850 x 400
1x Each Article “Thumbnail” // 380×240
1x Sidebar “Recent Posts” Thumbnail // 60×60
For those i have followed set-up in my function.php:
add_image_size(‘Top Post’, 850, 400, true);
add_image_size(‘Each Article’, 380, 240, true);
add_image_size(‘Sidebar’, 60, 60, true);
So….I’ve upload a featured image (expl. 850 x 400), the Top Post Image fit, but the rest won’t crop to the correct size.
How to solve it?
Thanks in Advance!
Jonathan
It’s a question of aspect ratio, as explained (sort of) in my article.
In your example, the original image is 850 x 400, which is an aspect ratio of 2.125. However, your “Each Article” image size aspect ratio is 1.58. This means that your original image will never fit properly in the Each Article image size.
You have two alternative solutions:
1. Make sure that your new image sizes are always exactly the same aspect ratio as that of the images you intend to upload. For example, most digital cameras produce images with an aspect ration of 3:2. Therefore ensure that your new image sizes match this, eg: 300 x 200, 450 x 300, etc
2. Don’t worry about aspect ratio, but accept that your images may be cropped unfavourably.
very helpful, thanks for this.
Any chance that you know how to set the dimensions dynamically using a variable?
Something like this
add_image_size( ‘mythumb’, $custom_width, $custom_height, true );
above doesn’t want to work, only if I enter the exact pixels values width numbers.
Your variable has to be defined somewhere where it is accessible to your add_image_size() function. For example, assuming your code is in functions.php, you can define the variable immediately above that code in functions.php.
Thanks for the post…but i normally use this method to resize my images in wordpress..it makes use of some plugin to do this
Resize Images In WordPress
This article isn’t about resizing images, it’s about creating new image sizes during the upload process. Not quite the same thing.
For resizing images that have already been uploaded, I always use the excellent Regenerate Thumbnails plugin.
I dont know programming. I wqant to do the following with featured images
Resize
Add URL
Align them either right, left or centre or in middle of an article
As of now I see these happening only with “Insert Media”, but when I select an image uploaded via Insert media as a featured image, it uploads another image.
Please advice.
How to I navigate to functions.php of my theme as per your article?
Hi,
Your questions are a little beyond the scope of the article or indeed the purpose of this site, but you can find your theme’s functions.php in your theme’s folder in the wp-content/themes directory.
Hope this helps!
Absolutely the best tutorial on how the image sizes work, and how they can be adjusted. Thank you for putting such time and effort into this!
Thanks, Nicole! Glad you found it useful.
Great article! A question though, I have my friends website of whom I’m just customizing the optimal theme on the Genesis framework. I was hoping to set up a featured banner image for each page of the site (not have featured images for posts). Can I use part of the method to do so? I haven’t found any articles that explain to to set this up.
No, not really the same topic I’m afraid.
You would have to use Genesis hooks to add the image to the pages, either using a child theme page template (page.php), or a function with conditional tags in functions.php to pull in the image relevant to each page.
Try posting a question on the StudioPress Community forums. Good luck!
Hi,
Great post. It is old but still valid. 🙂
One related (or not) question:
If i decided to use external images on my posts and resize them using the wordpress functions, will wordpress still store the images or they will be generated any time the page is loaded again?
Thanks
It’s not that old… 🙂
Yes, it’s still valid, though the Media interface changed its look and feel with WP 3.4.
As to your question, I’m not quite sure what you mean by resizing external images using the WordPress functions. Any image uploaded via the Add Media media will be stored on your server (usually in your wp-content/uploads folder) together with the thumbnail, medium, large and any custom image sizes created by your theme via the add_image_size function.
Ade, what a great and thorough article.
I found this while reviewing my needs for various image sizes on a project. I found two other image sizes that may be worth addressing in this post.
Both of them ‘Banners’ I presume one is a ‘thumbnail’ and the other a full size banner.
(Banner thumb) 300 x 100 cropped
(Banner full-size) 600 x 150 cropped
I have not dug around yet to determine where they are declared. Or what their ‘names’ are to use them. the_post_thumbnail(‘banner?’)
Thanks for writing.
~David
Hi,
Thanks for the feedback! 🙂
These “banner” image sizes are being added by your theme (or a plugin, perhaps), the standard WP sizes being: thumbnail, medium, large and full. You need to find where these are being added – usually in functions.php, but not necessarily – via the add_image_size() function, so that you can see the “names”.
It’s worth noting that if you don’t have the GD extension installed, wordpress will happily accept the new image size settings, even report that it has regenerated thumbnails if you use the regenerate thumbnails plugin – but not actually generate the files.
Thanks for the tip, Andrew.
Thanks – stupendously useful article. I’ve fixed my featured images…
This might be old but it made just made my life a whole heck of alot easier now I don’t have to worry when I’m on the road and uploading images and don’t have access to photoshop.
Cool! Glad you found it useful. 🙂
Hi,
is it possible to get a “duplicated” version of the original uploaded image? clients often send images with correct dimension but too large filesize. it would be cool, wordpress could save a lighter version of the file but with original sizes.
if i set something like:
add_image_size( ‘original’, 4000, 4000);
nothing happens, because the uploaded file is smaller than 4000×4000. but if my client uploads an image with 5mb, because he doenst reduce it before, than the website gets very slow.
Your “no cropping” diagrams were key to helping me identify a problem with my site. Then your detailed explanations and code examples helped me fix it. The developer said it couldn’t be done. Thank you so much!
Cool! Glad you found it useful. 🙂
Nov 2013 and still very useful. Thank you!
Nice and grand dive into a guite essential part of wp-development. Thanks man 🙂
Hi, A huge thanks form someone who is new to the world of wordpress. Your article helped make sense of a new area that was giving me a lot of trouble. Thank you!
HI.
I want to resize image but don’t want it to crop also don’t want to reserve aspect ratio. This can be achieved? so images should be off exact size
Regards
Excellent work. Bravo
But…I still cannot make my post feature images to have the same size and to be aligned.
What I have to do?
Please help!