This is the Tutorial for the Serial Posts plugin for WordPress. Links to other resources for this plugin can be found in the menu in the sidebar.
Current version of the plugin is: 1.3.2
Using the plugin
The plugin is designed to display the list of Serial Posts when you view the single post page of an article which is a member of a Serial. Therefore, you need to assign relevant posts to a Serial (see below) and use one of the following two methods for displaying the list: a shortcode or a template tag, either of which may be used. If you want to display the list embedded within the post/page content, use the shortcode. If you want to display the list immediately below or above the content, either method is appropriate. Whichever method you choose, stick to it and – in normal use – don’t mix the two methods (otherwise you may get duplicate lists showing up).
Template tag: To use the template tag, add the Serial Posts template tag to your single post theme template file, typically single.php or index.php depending on your theme, wherever you want to display the list of posts.
<?php serial_posts(); ?>
A typical place to put this code is after the article main heading or, more commonly, at the end of the post content, ie somewhere after the the_content() function call. The Serial Post template tag must appear within the Loop, which normally starts with this code:
<?php if ( have_posts)... ; ?>
and ends with:
<?php endwhile; endif; ?>
Shortcode: Add this shortcode directly into the post editor when writing or editing a post.
[serialposts]
Assigning a Post to a Serial
When writing or editing a Post, create a Custom Field Key called Serial and give it a value of the name of your series. For example, My New Series. You can create as many different Values for this Custom Field Key as you like – but you can only ever assign one Serial name to any one Post. This means that you can create several Serials comprising various Posts within your blog. The following screenshot shows the creation of a Serial name called “Beginner Blogger”. Note that the Custom Field Key of Serial must be typed exactly as shown.

Click image to view larger version.
Configuring the plugin Settings page
The Serial Posts configuration page is accessed through the main Dashboard menu, Settings > Serial Posts. This is where you configure how the List Heading appears above the list of Serial Posts, and where you can select options for including the currently viewed post within the list and, if so, whether or not this post should appear as a link.
The options are as follows:
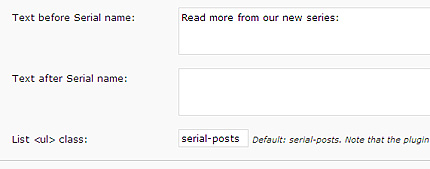
- Text before Serial name:
- Text after Serial name:
- List <ul> class
- Include current post in list of Serial Posts (checkbox)
- Show current post as a link (checkbox)
There is also a Reset all options to Default settings checkbox, should you wish to re-load the default settings and overwrite your own settings.
Examples showing how the Settings affect the display of the Serial Posts list.
The following screenshots show three examples of how to configure the Text before Serial name and Text after Serial name options.
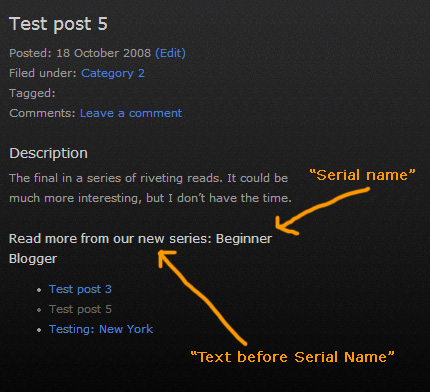
The purpose of these two fields is to enable you to add some text before and/or after the Serial name. Basically, the list heading can consist of three elements as follows:
Text before Serial name – Serial name – Text after Serial name
Each element is separated by a space. Therefore, you may need to be a little imaginative with the placement of punctuation in order to get the list to look as you want. (Note to self: may add a neater way of dealing with punctuation in a future release.)
Please note that the Serial name is always shown as a heading for the list of posts. If you only want to show the Serial name, blank out the Text before Serial name and Text after Serial name fields and click the Update Options button.
In the following examples I have assigned a Serial name of Beginner Blogger to three posts. The screenshots show the Settings and the resulting output when viewing one of these three posts. For simplicity’s sake, the images show only the relevant part of the page.
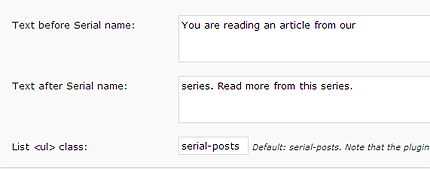
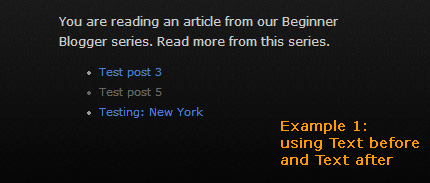
Example 1: Using text before and after
In this example I’ve added text in both the Text before Serial name and Text after Serial name fields.
And the result:
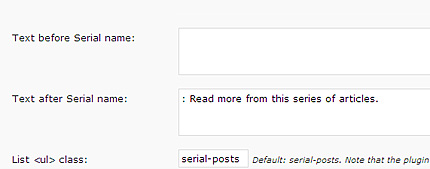
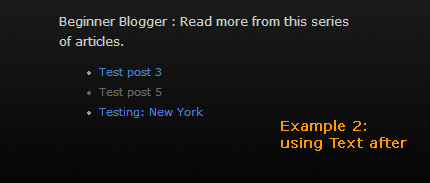
Example 2: Using text after only
In this example I’ve blanked out the Text before Serial name field and added some text in the Text after Serial name field.
And the result:
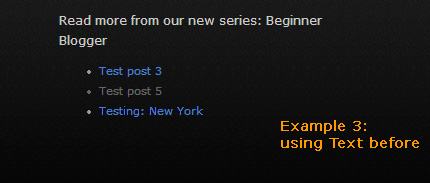
Example 3: Using text before only
In this example I’ve added some text in the Text before Serial name field and blanked out the Text after Serial name field.
And the result:
Hopefully these three examples show you how flexible these options are.
Other Settings
- Include current post in list of Serial Posts (checkbox)
- Show current post as a link (checkbox)
The following screenshot shows the defaults for these two checkboxes: currently viewed post (in this example “Test Post 5″) is included in the list (checked) but not shown as a link (unchecked).
Other Resources
Please refer to the menu of Serial Posts Resources in the sidebar.
