This User Guide explains how to use the plugin together with examples of the code you will need to use in your theme’s functions.php in order to display a Taxonomy Image on the frontend. As it leverages existing code in the Genesis theme framework, the Genesis Taxonomy Image plugin is a light and efficient addition to your site.
The Basics
After installing the plugin, the only functionality ready for immediate use is the uploading of an image to your taxonomy Terms (one image per Term). To do something useful with this image, ie to display it on the frontend of your site, requires some code in your theme’s functions.php – examples of which can be found in the How to display the Taxonomy Image on the frontend section, further on in this User Guide.
Please note that although the examples provided in the User Guide concentrate on using this plugin with built-in Categories, the same principles apply when using Post Tags or a Custom Taxonomy.
How to Upload Images to Taxonomy Terms
Short version…
If you are already familiar with using the Genesis options available in the Category (and custom taxonomy) edit screens, for adding an archive Title and Description to a Category, you will see the new image Upload/Add button and thumbnail just above these Genesis term meta options in the relevant edit screen.
Slightly longer version…
Need more precise instructions? Just follow the step by step instructions below.
Step 1. In the Dashboard, navigate to the Categories edit screen (Posts > Categories).
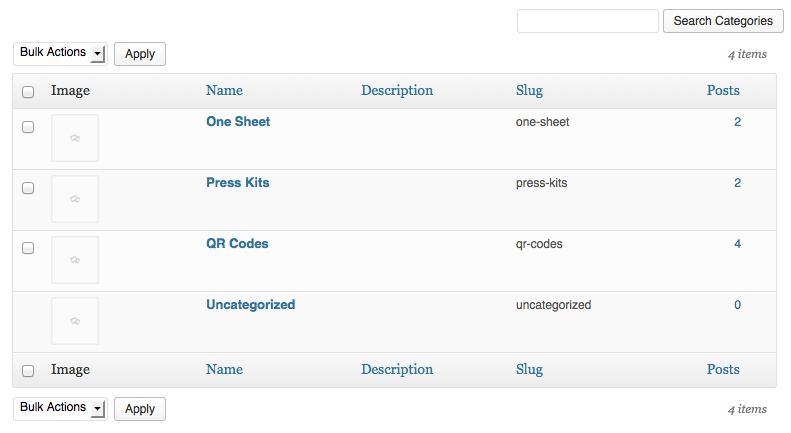
Step 2. You will now see a new column called “Image” in the table of Category terms on the right side of the screen:
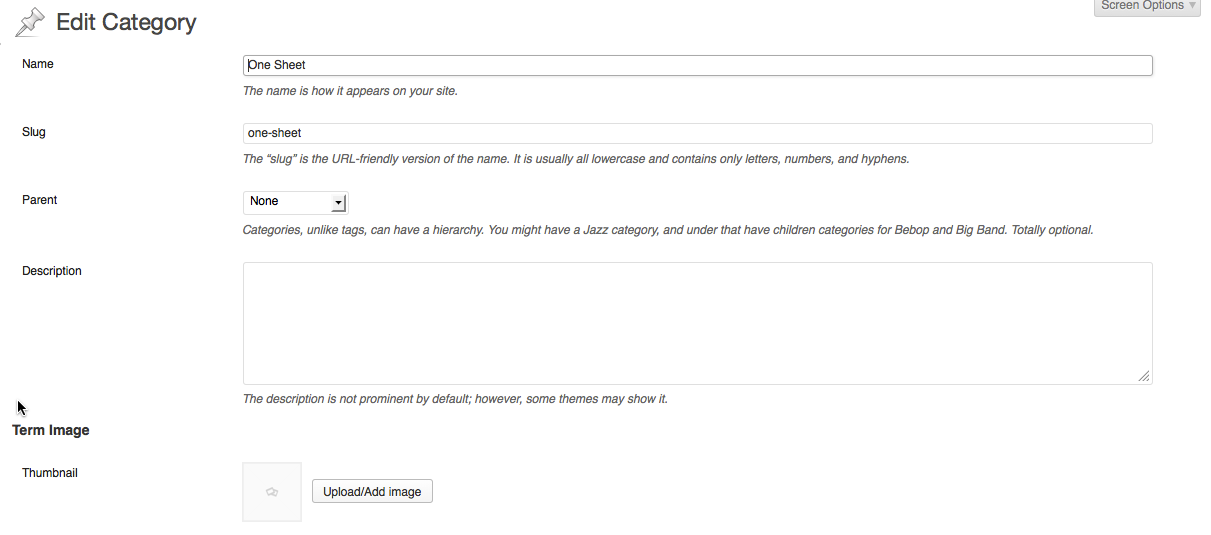
Step 3. Now Edit your Category and you will see a new option “Term Image”, together with an Upload/Add image button, in the category’s Edit Screen:
Step 4. Click the Upload/Add image button to launch the familiar Media Upload panel, and either select an existing image in your Media Library or upload a new one in the usual way. Once you have selected the image to use, click the Use image button in the Media panel to close the Media Uploader panel and to return to the Edit Category screen. You should now see your chosen image displayed as a thumbnail in the Edit Category screen:

Step 5. Very important – you must now click the Save button at the bottom of the Edit category screen in order to save the image for later use.
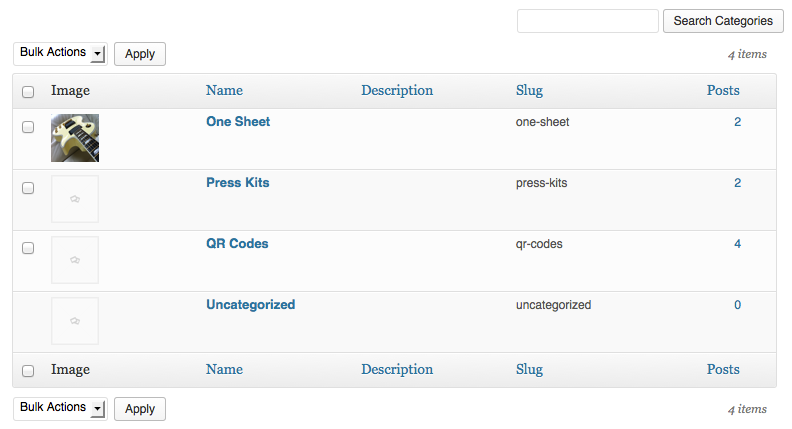
Step 6. Once you have clicked the Edit screen Save button, you will be taken back to the main Categories edit screen where you will see a thumbnail of your image in the “Image” column:
To Remove or Change an existing image
Navigate to the Edit screen for the Term (category) in question and use the Remove image button to get rid of the existing image. Remember though, once you have done this, you must click the main Save button at the bottom of the Term’s Edit Screen in order for the removal to take effect.
To upload a different image in place of the one already in use, navigate to the Edit screen for the Term in question and use the Upload/Add image button to launch the Media Uploader panel to select or upload a new image. See Steps 3, 4 and 5 above.
How to display the Taxonomy Image on the frontend
The following code examples show you how to use the Image in various contexts.
Note that all of the code examples are to be placed in your theme’s functions.php, anywhere before the closing PHP tag at the bottom of the file (if it exists).
As ever, I always recommend people to NOT use the Dashboard Theme Editor when coding – one silly syntax error could lock you out of the Dashboard. Use a plain text editor to edit functions.php on your local computer, and then upload the edited file to the appropriate place on your server using FTP or your hosting File Manager.
First, the science bit…
The display of the Images on the frontend of your site depends on the use of Action Hooks and Filters and a special “Template Tag” function built into the Genesis Taxonomy Images plugin, called gtaxi_get_taxonomy_image(). The clever thing about the gtaxi_get_taxonomy_image() function is that you can use its various arguments to customise the output of the function.
Here is a rundown of the arguments you can use, together with a brief comment against the ones that you will use:
gtaxi_get_taxonomy_image() arguments
/**
 * gtaxi_get_taxonomy_image() args
 *
 * @since 0.8.0
 */
$defaults = apply_filters( 'gtaxi_get_taxonomy_image_default_args', array(
	'format'   => 'html', // 'html' or 'src'
	'size'     => 'full', // Image size
	'num'      => 0,
	'attr'     => '', // Array of additional html attributes
	'fallback' => 'placeholder', // Yep, a fallback image
	'context'  => '',
) );
Let’s move on to code samples, where you will find that each of them follows a pattern:
- Use add_filter() or add_action() to hook a callback function.
- Write a “callback” function for the Action Hook mentioned.
- Call gtaxi_get_taxonomy_image() in your “callback” function.
- Add the relevant arguments to gtaxi_get_taxonomy_image() to customise its output.
It sounds (or rather, reads) more complicated than it really is. Read on!
Display Image in Genesis Archive Description box
Default usage with no arguments passed to gtaxi_get_taxonomy_image()
// Code snippet - Example 1

add_filter( 'genesis_term_intro_text_output', 'sgr_add_tax_image', 9 );
/**
 * Add Genesis Taxonomy Image to Archive Description box
 *
 * Genesis hooks wpautop to the same 'genesis_term_intro_text_output' filter, therefore:
 * - to display IMG and text in same <p> tag, ensure that this function is hooked with priority < 10
 * - to display IMG outside of <p> tag added to text, ensure that this function is hooked with priority 10 or higher
 *
 */
function sgr_add_tax_image( $text ) {

	$image = gtaxi_get_taxonomy_image();

	return $image . $text ;
}
Note that, by default, the function will display the “full” size image – which may or may not be what you want. The following examples use the functions arguments to modify its output, such as image size, alignment, etc.
Modify arguments to display thumbnail image size
add_filter( 'genesis_term_intro_text_output', 'sgr_add_tax_image', 9 );
/**
 * Add Genesis Taxonomy Image to Archive Description box
 *
 * Displays "thumbnail" image size
 *
 * Genesis hooks wpautop to the same 'genesis_term_intro_text_output' filter, therefore:
 * - to display IMG and text in same <p> tag, ensure that this function is hooked with priority < 10
 * - to display IMG outside of <p> tag added to text, ensure that this function is hooked with priority 10 or higher
 *
 */
function sgr_add_tax_image( $text ) {

	$image = gtaxi_get_taxonomy_image( array(
			// Add arguments
			'size' => 'thumbnail',
	) );

	return $image . $text ;
}
The ‘size’ argument can be any image size that has been registered by your theme (or another plugin), or any of the builtin WordPress image sizes, eg “full”, “large”, “medium” or “thumbnail”. Default is ‘full’.
Modify image size and float the image
add_filter( 'genesis_term_intro_text_output', 'sgr_add_tax_image', 9 );
/**
 * Add Genesis Taxonomy Image to Archive Description box
 *
 * Displays "thumbnail" image size, adds 'alignleft' class
 *
 * Genesis hooks wpautop to the same 'genesis_term_intro_text_output' filter, therefore:
 * - to display IMG and text in same <p> tag, ensure that this function is hooked with priority < 10
 * - to display IMG outside of <p> tag added to text, ensure that this function is hooked with priority 10 or higher
 *
 */
function sgr_add_tax_image( $text ) {

	$image = gtaxi_get_taxonomy_image( array(
			// Add arguments
			'size' => 'thumbnail',
			'attr' => array( 'class' => 'alignleft' ),
	) );

	return $image . $text ;
}
The ‘alignleft’ class is a standard CSS class used by all Genesis themes, and floats the image left.
Modify image size and suppress the plugin’s placeholder image
By default, in the event that an Image has not been set for the cateory or term in question, the plugin will display a placeholder image. This isn’t always ideal and you may prefer that in this case no placeholder image is displayed, in which case see the following example.
add_filter( 'genesis_term_intro_text_output', 'sgr_add_tax_image', 9 );
/**
 * Add Genesis Taxonomy Image to Archive Description box
 *
 * Displays "thumbnail" image size, with no fallback image
 *
 * Genesis hooks wpautop to the same 'genesis_term_intro_text_output' filter, therefore:
 * - to display IMG and text in same <p> tag, ensure that this function is hooked with priority < 10
 * - to display IMG outside of <p> tag added to text, ensure that this function is hooked with priority 10 or higher
 *
 */
function sgr_add_tax_image( $text ) {

	$image = gtaxi_get_taxonomy_image( array(
			// Add arguments
			'size' => 'thumbnail',
			'fallback' => '',
	) );

	return $image . $text ;
}
A more complex example
A more complex example to display a “portfolio” sized image (assuming such an image size has been registered by the theme), and which also floats the image left and suppresses the default placeholder image.
add_filter( 'genesis_term_intro_text_output', 'sgr_add_tax_image', 9 );
/**
 * Add Genesis Taxonomy Image to Archive Description box
 *
 * Displays "portfolio" image size, adds 'alignleft' class,
 * and suppresses placeholder image
 *
 * Genesis hooks wpautop to the same 'genesis_term_intro_text_output' filter, therefore:
 * - to display IMG and text in same <p> tag, ensure that this function is hooked with priority < 10
 * - to display IMG outside of <p> tag added to text, ensure that this function is hooked with priority 10 or higher
 *
 */
function sgr_add_tax_image( $text ) {

	$image = gtaxi_get_taxonomy_image( array(
			// Add arguments
			'size' => 'portfolio',
			'attr' => array( 'class' => 'alignleft' ),
			'fallback' => '',
	) );

	return $image . $text ;
}
As you can see, by simply modifying the gtaxi_get_taxonomy_image() arguments, it is very easy to customise the output to suit your needs.
Eagle-eyed readers will have noticed that in ALL the above examples I have used a priority of 9 for the add_filter() call. This is to ensure that the Image will be output within the same paragraph tag as the Archive Intro Text. If you don’t want to do this, ie you don’t want the Image within the Archive Intro Text paragraph tag, change the priority to 11 (though I don’t advise it, personally).
Display Image somewhere else in the theme
A couple of use cases come to mind:
- Case 1. You want to display a Taxonomy Image at the top of an Archive page but, for whatever reason, you don’t want to use the Genesis Archive Title and Intro Text functionality on your site
- Case 2. You want to display a relevant Taxonomy Image when viewing a Single Post
Case 1
The important difference compared to the previous examples is that we will now replace the add_filter() call with an add_action() call attached to a relevant Genesis hook. Here’s the code, explanations after:
add_action( 'genesis_before_loop', 'sgr_add_tax_image_alt', 15 );
/**
 * Add Genesis Taxonomy Image to Archive Pages
 *
 * Displays "full" image size, wrapped in Genesis Archive
 * markup
 *
 * Hooked to 'genesis_before_loop'
 *
 */
function sgr_add_tax_image_alt() {

	// Only display on category 3
	if ( ! is_category( 3 )  )
		return;

	$image = gtaxi_get_taxonomy_image();

	if ( $image )
		printf( '<div class="archive-description taxonomy-description"><p>%s</p></div>', $image );
}
In this example I haven’t passed any arguments to gtaxi_get_taxonomy_image() though, clearly, if you wish to do so, you can. Also, note the use of the Conditional Tag is_category() to ensure that the image is only displayed when viewing a specific category.
Case 2
This case is a little more complex. Currently, the plugin does not provide easy functionality for this, but will be addressed in the next update.
// Coming soon
Customise the Placeholder image
To replace the plugin’s Placeholder image with your own image, use the plugin’s gtaxi_placeholder_img_src filter to specify a different image src. Here’s an example:
// Coming soon

